
- Peel off the outer few leaves from a fresh ear of corn. Set aside one or two.
- Peel back, but not off, the remaining tender, inner leaves. (Don't worry if you lose one or two in the process. You just need enough to protect the corn a bit.)
- Remove the silk, and flip the inner leave back up.
- Use a strip of the leaves that you removed to tie around the corn, keeping the inner leaves in place. (You can also use twine for this step, but if you do, make sure you soak the corn before putting it on the grill to avoid catching the twine on fire.)
- Here, there are two theories. You can either soak the corn for about 30 minutes, or put it directly on the grill. Soaking will steam the corn a little, whereas skipping the soak will give you a heavier smokey flavor. Either method is fine.
- Place the corn on the grill over medium-high heat, rotating occasionally, for about 15-20 minutes or until the kernels are tender. Serve immediately.
Monday, July 5, 2010
Roasting Corn
Like the peppers, these take a little effort but are well worth it for the smokey flavor the corn picks up. Yum!
Roasting Peppers
Roasting peppers is much easier than you may think if you haven't done it before, and can be cone with pretty much any type of peppers. The recipe below uses poblanos, but the same method is used for bells. Whether you're grilling or just using the stove-top, it should only take a few minutes and is well worth the effort. Although I have done it on an electric stove, I don't recommend it for your first few tries. Either way, do yourself a favor and don't leave them unattended! Your beautiful peppers can very quickly go from "nicely roasted" to "burnt to a crisp".

- Turn the grill or the gas stove burner to high, and lay your peppers directly on the grate.
- After a few minutes, the skin will start to blister and turn black. At that point, rotate your pepper so that an unroasted portion is on the grate. Continue until the entire pepper is done.
- Remove the peppers from the heat and place in a paper bag, or bowl with plastic wrap, and let them sit at least half an hour. (This lets the steam from the peppers loosen the remaining uncharred skin.)
- Remove the tops from the peppers. The pepper should be soft, and the skin should come away easily enough to be removed by hand. Take out the seeds, and you're all set.

Roasted Corn & Poblano Soup
With the amazingly warm weather we've been having comes the perfect excuse to visit your local farmer's market: the incredible variety of fresh produce you can find this time of year. This past Thursday, I took my daughter on her very first field trip. We spent the morning at a local farm, feeding animals and enjoying the beautiful 70 degree weather, and we came home with 8 peaches and two big bags of freshly-picked corn. I've been dreaming of this soup ever since. We had some family over for dinner tonight, and we all had seconds, including the almost-3-year-old, and soaked up the remaining broth with our bread.
Feeds eight, or one batch for tonight and one for the freezer

Feeds eight, or one batch for tonight and one for the freezer

3 roasted poblano peppers, diced
1 red bell pepper, diced
about 4 cups of roasted corn
4 leeks, halved lengthwise, rinsed well, and cut into 1/4-inch slices
2 tbsp olive oil
1 tbsp sea salt
fresh-ground black pepper
3 tbsp cornstarch
5 cups chicken stock
1/2 tsp celery salt
1/2 tsp cumin
1/2 pint heavy cream
1 red bell pepper, diced
about 4 cups of roasted corn
4 leeks, halved lengthwise, rinsed well, and cut into 1/4-inch slices
2 tbsp olive oil
1 tbsp sea salt
fresh-ground black pepper
3 tbsp cornstarch
5 cups chicken stock
1/2 tsp celery salt
1/2 tsp cumin
1/2 pint heavy cream
- Heat the oil over medium-high heat in a large soup pot. Add the leeks and saute until just starting to wilt.
- Add the sea salt and pepper (to taste), and continue cooking until the leeks are soft.
- Sprinkle leeks with cornstarch, and stir until the cornstarch seems well-dispersed.
- Add the corn, poblano, bell pepper, spices, and broth.
- Bring the soup up to a boil, then reduce heat slightly and cook, covered, about 15 minutes, stirring occasionally.
- Add the cream, stir well, and re-cover. Cook 3-5 more minutes, until warm.
Thursday, June 24, 2010
Prupetta's Kitchen.... garden?
Given my extraordinary talent for having a black thumb, I've decided to try my hand at growing vegetables. Hopefully I can get a decent crop before I kill them all. :) So Mr. Meatball* and I took about 6 weeks of weed killing and pulling, tilling, box building, and planting, and finally came up with this.

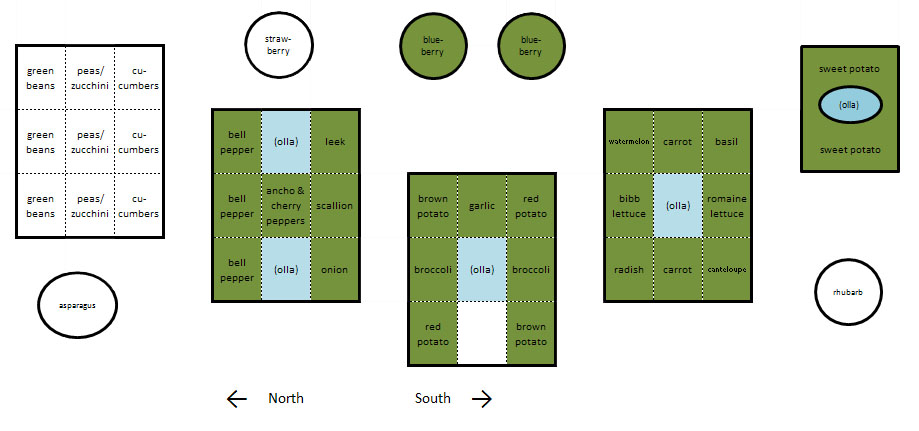
The green squares are already planted, the white are purchased but need to go in the ground, and the blue are ollas (pronounced "oya") which is basically an underground irrigation system. They're normally made of unglazed terra cotta, which allows the water to leach through the clay into the soil, but we're going makeshift this year, until I can get the studio set up and make some terra cotta jars.
I know it's impossible to read as-is, but here's what we've got, from left-right. If you click on the pic to enlarge, you should be able to see exactly what's where.

Box #2

Box #3

Box #4

*Mr. Meatball is getting decidedly skinny these days. He needs a new nickname, something less... rotund. I'll see if I can come up with some other meat-related pseudonym for him without resorting to the obvious.
The green squares are already planted, the white are purchased but need to go in the ground, and the blue are ollas (pronounced "oya") which is basically an underground irrigation system. They're normally made of unglazed terra cotta, which allows the water to leach through the clay into the soil, but we're going makeshift this year, until I can get the studio set up and make some terra cotta jars.
I know it's impossible to read as-is, but here's what we've got, from left-right. If you click on the pic to enlarge, you should be able to see exactly what's where.
- Box 1: green beans, peas, zucchini, and cucumbers. The circle in front is asparagus.
- Box 2: Bell, Ancho, and Cherry peppers, leeks, scallions, and white onions. The circle behind is strawberries.
- Box 3: white and red potatoes, garlic, red onions, and broccoli. The two circles behind are blueberry bushes.
- Box 4: watermelon, carrot, basil, Bibb and Romaine lettuces, and cantaloupe. (The carrots and radishes haven't sprouted at all. I think I killed them before the seeds even made it into the ground!)
- Box 5: sweet potatoes, with rhubarb in front.
- The terra cotta planters along the back edge are herbs and a few small flowers.

Box #2

Box #3

Box #4

*Mr. Meatball is getting decidedly skinny these days. He needs a new nickname, something less... rotund. I'll see if I can come up with some other meat-related pseudonym for him without resorting to the obvious.
Thursday, February 11, 2010
Update on the kitchen makeover
I know I promised pictures. And I will deliver, one of these days. Suffice it to say that we’re at two and half months and counting. Here’s the laundry list of tasks we’ve accomplished so far
- 4 layers of tile ripped out
- 8’ drop ceiling removed and new ceiling height raised to the full 12’ the rafters would allow
new insulation hung - electrical system completely revamped
- new gas line run to the kitchen and connected to my brand-spanking-new 5-burner gas range (it has a meat probe and a bread-proofing setting – woo hoo! I feel so fancy.)
- over-stove cabinet removed and replaced with an actual range hood (can you believe there was no light or vent over the old stove?? What on earth did the previous owners do when something got smelly or smokey? But then again, given the immaculate state of the 1959 wall oven, I’m not convinced anyone ever actually cooked in this house before we moved in.)
- dining/great room wall pushed out 2 feet
- made one end of that new wall a half wall
- door to the foyer closed off
- fresh drywall installed, which is nearly finished with tape and mud
- 3 recessed lights and 4 pendant lamps hung
- New cabinets ordered to match the existing units (which will be delivered aaaaaaaaany day now…. or so I’ve been promised several times.)
- New counters ordered
Still lots of work to be done, including choosing and purchasing tile for the floor and backsplash, new hardware for the cabinets, and paint for the cabinets (some shade of white, but not a blindingly sterile hospital-esque white). So far so good. We’re doing all of the work ourselves, with the help of some amazingly selfless family members, so I’m not expecting it to be done overnight. As long as there continues to be progress, I’m a happy girl.
Oh, and a little side note: our little Meatball family will be growing by one member, somewhere around August 17th. I’ll try to keep my recently-acquired chicken aversion out of the way of creating new recipes. : )
Happy cooking.
EDIT: Since I originally wrote this post a few days ago, the cabinets have been delivered. They are, however, exactly the material we told the contractor we DID NOT want, so now we're in the fabulous phone-tag cycle that will hopefully, eventually, end with these cabinets being removed from their temporary homes in my dining room and garage, returned to the contractor's workshop, and replaced with the right ones. Hopefully. Eventually. If there is any truth in the concept of karma, that is. Otherwise, I may need to change my religious beliefs yet again. : )
Monday, February 8, 2010
Reynolds Giveth, and Reynolds Taketh Away…. and then they Giveth Back Again
Okay, so maybe the biblical reference is a bit extreme, but if you had used the Reynolds Handi-Vac® before it was pulled from the market, then you would agree with me that it was an incredibly useful tool, and, like me, you’d be a bit dismayed when you searched store shelves in vain for a few stray boxes of the storage bags before finally realizing there were none to be had.
This was a fantastic system. Like the larger, bulkier units you can buy at big box stores to hermetically seal your food before packing up the freezer, the Handi-Vac bags would seal off your food from freezer burn by removing excess air, thereby saving you a ton of cash in the long run because food would stay fresh longer. Unlike the big bulky units, the Handi-Vacs were, well, NOT big and bulky. You had a small, hand-held vacuum pump (there were both battery-operated and hand-powered units available at different times). Instead of rolls of plastic, you could just buy freezer bags as you normally would, press the pump to the little built-in circle near the top of the bag, and VOILA! Instant shrink-wrap. I loved them. I really, really loved them. Even Papa Prupetta loved them because he had a new tool to play with. (It’s just like that little gun they use to create bridal and baby registries in department stores. What is it about electronics that will get any man’s heart thumping??)
And now, you too can experience the love through the joy that is the Home Shopping Network. Apparently Reynolds has joined forces with Debbie Meyer, maker of Green Bags, to market the Handi-Vac system through HSN, which carries supplies through their website. This makes Mama very happy.
Saturday, February 6, 2010
Snowy Day Bratwurst
This one isn't a freezer meal, but it's so little work and so few ingredients that it's easy to whip up in a flash. Today, we've got at least 18 inches of snow on the ground and it's still coming down hard and fast. Round one of shoveling is long done, so this was a nice stick-to-your-ribs lunch before heading out for round two.
Feeds three adults and a toddler with some leftovers
8 bratwurst (I like Johnsonville, but whatever you prefer is fine)
1 large yellow onion
1 medium yellow bell pepper
1 sturdy dark beer (we used Brooklyn Brown Ale)
Feeds three adults and a toddler with some leftovers
8 bratwurst (I like Johnsonville, but whatever you prefer is fine)
1 large yellow onion
1 medium yellow bell pepper
1 sturdy dark beer (we used Brooklyn Brown Ale)
- Peel the onion, discard the ends, cut in half. Cut each half into thin slices, about 1/8" thick.
- Core and de-seed the pepper, cut in half length-wise, and slice as above.
- Heat about 1 tbsp vegetable oil in a deep, heavy-bottom pot. Saute the onions and pepper until lightly carmelized, 7-10 minutes.
- Scoot the onions to the side so there's some space for the brats to contact the bottom of the pan. Quickly brown on both sides, then cover with the onions.
- Pour in the beer and cover tightly.
- Bring to a boil, and let it simmer until the brats are cooked through, about 30 minutes.
- Serve on long rolls with a little spicy mustard, if you like (but plain is just fine, too).
Subscribe to:
Posts (Atom)